What is a Domain Name Redirect or URL Forwarding? How does it work?

Have you recently acquired a new domain name for your website? Or perhaps you'd like to ensure that visitors who find variations or typos of your main domain still find their way to your content. URL forwarding offers a simple solution directing traffic seamlessly. Let's explore its benefits and the process of setting it up.
You register a new domain name, and now want to use it with your existing website. Alternatively, you want to forward your new domain name to your old website. That's where domain name redirect steps in.
What is URL Forwarding (Domain Name Redirect)?
A domain name redirect, also known as URL forwarding, allows you to automatically send visitors from one domain to another.
For example, if you own multiple domains like mybusiness.net and mybusiness.org, you can redirect them all to mybusiness.com. This ensures that anyone who types in any variation will end up on your main website. You can also redirect them to social media profiles.
Why is redirecting your domain name important?
URL forwarding offers several key benefits that can enhance your online presence and ensure a seamless experience for your visitors:
- Redirecting traffic: Ensure that visitors using different domain variations reach your main site.
- Brand consistency: Maintain a unified online presence across different domains.
- Ease of use: Simplify sharing and accessing your website with memorable URLs.
How does URL forwarding work?
There's some clever server magic at play when you redirect a domain name. Imagine someone types in your redirected domain, like "mybusiness.net." Here's what happens:
- Traffic control: Their request gets sent to a special internet traffic controller, kind of like a switchboard for websites.
- Forwarding instructions: This controller checks its records and sees a forwarding rule for "mybusiness.net." It then knows to send the visitor somewhere else.
- Destination Reached!: The visitor is automatically moved away to the new location, which is your main website (like "mybusiness.com").
There are different ways to set up these forwarding instructions, depending on what you want to achieve:
- Keeping the old look (Framed Forwarding): This shows the new website content, but the visitor's address bar still displays the original domain ("mybusiness.net").
- Permanent move (301 Redirect): This tells search engines and visitors that "mybusiness.net" has permanently moved to "mybusiness.com." This helps update search results and avoid confusion.
- Temporary Change (302 Redirect): This is useful for short-term situations where your website might be temporarily unavailable at its usual address.pen_spark
How to set up URL/domain forwarding?
To set up URL/domain forwarding, please follow the instructions below. This option is only available if the domain name is using EuroDNS name servers.
1. Log in to your EuroDNS account and click DOMAIN NAMES > ACTIVE.
2. Move the cursor over the domain names you'd like to configure and click on Edit DNS Zone.
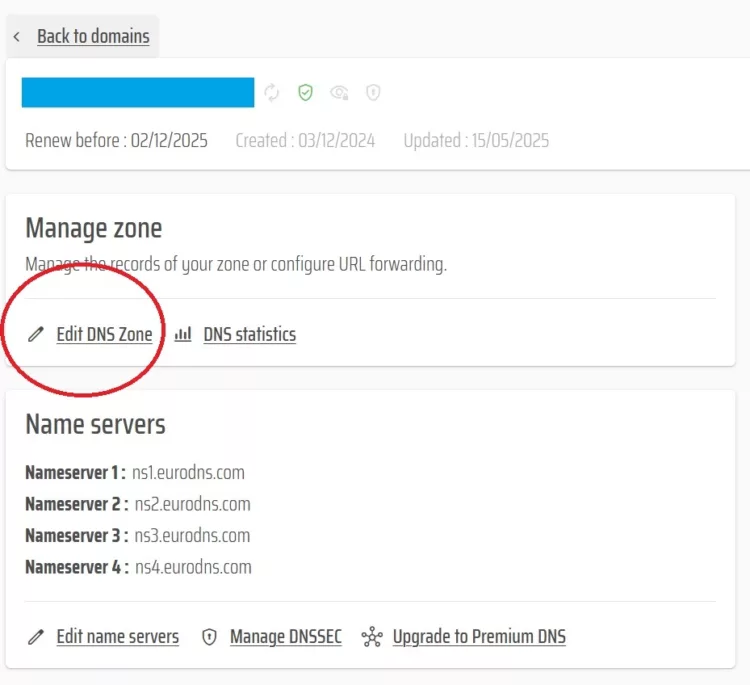
3. Click on MANAGE ZONE.
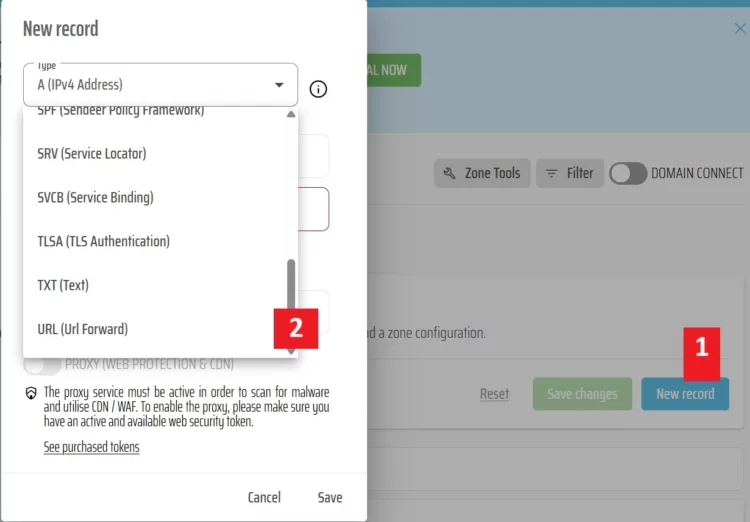
4. Click on NEW RECORD.
5. Select URL Forward in the Type dropdown menu.
6. In the Host field, enter the hostname or subdomain of the source URL. Create two URL forward rules and enter as host only @ in the first rule and only www in the second rule or a different subdomain.
7. In the first Forward To field, type the destination URL (www.example.com).
8. In the second Type field:
- Select "permanent redirect (301)" to display the destination URL in the address bar of the browser.
- Select "in a frame" to display the source URL in the address bar of the browser.
9. Click on SAVE RECORD.
10. Click on SAVE ZONE.
Note: DNS changes usually need up to 24 hours to propagate throughout the entire Internet.
If you have any questions please get in touch and we'll be happy to talk you through the process.
URL Forwarding FAQs
Does URL forwarding affect SEO?
A 301 permanent redirect transfers SEO value to the new domain, while 302 redirects are temporary. Framed forwarding is not recommended for SEO.
Can I redirect multiple domains to one site?
Yes. Many businesses forward alternative TLDs (.net, .org, country-code domains) to their main .com site.
How long does it take for a redirect to work?
Yes, URL forwarding works only if your domain uses EuroDNS name servers.
Top 4 Benefits of Using a Custom Email Domain
Related articles: